
A guide to bronzing sticks is the only reference you need to swap powder bronzer for cream and never look back. Bronzing sticks deliver warmth, dimens
A guide to bronzing sticks is the only reference you need to swap powder bronzer for cream and never look back. Bronzing sticks deliver warmth, dimension, and a lit-from-within finish that powders rarely match, but the technique is different enough that most people apply too much or in the wrong place. This guide to bronzing sticks walks through 7 expert-tested picks, how to find your shade, and the application moves that look polished on every skin tone.
Reviewed by the BeautynFacts editorial team. Last updated: May 2026.
The Ultimate Guide to Bronzing Sticks: Understanding, Benefits, and How to Use Them
There is something undeniably magnetic about skin that looks warmed from within, as though you just returned from a long afternoon walking through a Mediterranean village or lounging along a sun-dappled coastline. That glow, the soft bronze that catches the light along your cheekbones and softens the edge of your jaw, has become the signature of modern, polished beauty. And the secret weapon behind it, for most makeup lovers and professional artists alike, is the humble bronzing stick. This single, portable tool has quietly replaced entire palettes in many makeup bags because it delivers warmth, dimension, and that coveted lit-from-within quality in seconds with almost no skill required.
If you have ever struggled with powder bronzers that look muddy, streaky, or flat on your skin, or you have watched tutorials where creams seem to melt seamlessly into the complexion and wondered how to replicate that effect, this guide is for you. We will walk through the science behind what makes a bronzing stick work, how to choose the right shade and finish for your undertone, step-by-step application techniques that flatter every face shape, common mistakes that age the face or muddy the skin, and the insider tips makeup artists use behind the scenes at fashion weeks and on film sets. By the end, you will understand not just how to use a bronzing stick, but how to make it look like the glow is actually coming from your skin rather than sitting on top of it.
What Exactly Is a Bronzing Stick?
A bronzing stick is a solid, twist-up cosmetic formulated in a portable tube that delivers a warm, bronze-toned pigment directly onto the skin. Unlike traditional powder bronzers, which rely on tiny pressed particles of colour picked up with a brush, bronzing sticks use a wax and oil emulsion base loaded with iron oxides, mica, and sometimes light-reflective pearls. The result is a creamy texture that glides across the complexion, blends into the skin rather than sitting on top of it, and leaves behind a veil of colour that mimics the way melanin responds to sunlight.
The modern bronzing stick evolved from classic cream contours and the monoi-oil-tinted balms that Polynesian women have used for centuries to give their skin a glowing, healthy finish. Cosmetic chemists refined these ancient traditions into stick format by adjusting the ratio of waxes such as carnauba, candelilla, and beeswax to oils like caprylic triglycerides, jojoba, and squalane. This balance is what gives a quality bronzing stick its signature creamy-but-sturdy payoff. Too much wax and the product drags; too much oil and it melts before you can blend it.
What sets a bronzing stick apart from a contour stick or a cream blush is its specific colour profile. A true bronzer leans warm, pulling from golden, amber, terracotta, or caramel tones that echo the colour skin naturally turns in the sun. Contour sticks, by contrast, are formulated to mimic shadow, so they skew cooler, greyer, or ashier. Understanding this distinction is the first step in mastering the product because it determines where on the face it should be placed and how it should be blended.
The Science of That Sun-Kissed Glow
To appreciate why bronzing sticks work so beautifully, it helps to understand what actually happens to skin when it tans. When ultraviolet radiation hits the skin, melanocytes produce melanin as a defence mechanism, darkening the surface and giving the skin that warm, bronzed hue. The colour is never uniform; it concentrates on the parts of the face that naturally receive the most light, meaning the forehead, the tops of the cheekbones, the bridge of the nose, and the chin. A bronzing stick essentially simulates this biological response, placing pigment where the sun would have placed it naturally.
The pigments that achieve this effect are mostly iron oxides, which are non-toxic mineral compounds that have been used in cosmetics for centuries. Red iron oxide, yellow iron oxide, and black iron oxide are blended in carefully calibrated ratios to produce shades that range from soft honey to deep espresso. Mica, a naturally occurring silicate mineral, is often added to give the bronzer its subtle luminosity. High-quality formulas use finely milled mica in small percentages, which creates a satiny finish rather than a disco-ball sparkle.
Many newer bronzing sticks also incorporate skincare-adjacent ingredients such as hyaluronic acid for hydration, squalane for barrier support, niacinamide for tone correction, and botanical extracts like green tea or centella asiatica for soothing and antioxidant benefits. Dermatologists have become increasingly supportive of cream-based complexion products like these because they double as a delivery system for beneficial actives while providing cosmetic colour. This is particularly valuable for mature skin, which benefits from the hydrating properties of cream formulas that cling to emollients rather than settle into fine lines the way powders can.
Why Cream Beats Powder on Most Skin Types
Powder bronzers have their place, especially for very oily complexions or in ultra-humid climates where creams can slide. But for the majority of skin types, cream formulas in stick form offer significant advantages. They blend into the skin, creating dimension rather than coating the surface. They photograph more naturally under both flash and natural light because they reflect light the way skin does. They resist the dreaded chalky or muddy effect that can plague poorly pigmented powders. And critically, they play beautifully with other cream products, allowing you to layer blush and highlighter on top without disturbing the base.
Key Benefits of Adding a Bronzing Stick to Your Routine
The appeal of a bronzing stick goes far beyond the cosmetic glow. When used thoughtfully, this product can genuinely transform a makeup routine, streamlining steps and producing results that look more professional with less effort. The first and most obvious benefit is the instant warmth it brings to the complexion. Many foundation formulas, especially those designed for fair or neutral skin tones, can leave the face looking flat or one-dimensional. A swipe of bronzer along the high points of the face immediately restores depth and life, making the skin look healthier and more three-dimensional.
Portability is another underrated advantage. A bronzing stick slips effortlessly into a purse, gym bag, or carry-on, and you can apply it without a mirror in a pinch because the stick format is so forgiving. There is no brush required, no risk of spilling powder, and no fiddling with multiple products. For the woman who values a polished look but lacks the time for a full contour routine, the bronzing stick delivers eighty percent of the result in twenty percent of the time.
The product also excels at multi-tasking. You can use a bronzing stick to contour cheekbones, warm up a cool-toned foundation, add definition to a pale décolletage, define the hollows of the temples, or even deepen the crease of the eyelid for a monochromatic, no-fuss look. Some makeup artists use bronzing sticks to softly darken the hairline, creating the illusion of a more sculpted face shape or camouflaging a receding edge.
Finally, bronzing sticks offer a safer alternative to actual sun exposure. Years of dermatological research have established that cumulative UV exposure is the leading cause of premature aging, hyperpigmentation, and skin cancer. Board-certified dermatologists consistently recommend that patients replace sun-seeking behaviour with sunless alternatives, and cosmetic bronzers sit at the top of that list because they deliver the aesthetic without any of the DNA damage.
Understanding the Different Types of Bronzing Sticks
Not all bronzing sticks are created equal, and understanding the subtle differences between formulas will help you select the one that flatters your skin and fits your lifestyle. The three main categories to know are cream sticks, gel sticks, and balm-to-powder sticks, and each has its own ideal use case.
Cream bronzing sticks are the most common and versatile. They have a rich, emollient texture that blends with the warmth of fingertips or a dense synthetic brush. These are ideal for normal to dry skin because the emollient base adds a layer of moisture and flexibility. They tend to have a demi-matte or satin finish and work beautifully on mature skin because they do not cling to fine lines or dry patches.
Gel bronzing sticks have a more transparent, watery feel and often deliver a sheer wash of colour rather than a concentrated pigment. They are fantastic for layering, for creating a subtle all-over warmth, and for use on bare skin when you want a no-makeup makeup effect. Gel formulas typically dry down quickly and resist transfer better than their cream counterparts, which makes them a good choice for humid climates or active days.
Balm-to-powder sticks apply as a creamy balm but set into a soft, powdery finish within seconds of contact with the skin. This hybrid format suits combination and oily skin types because the powdery finish controls excess shine while still delivering the buildable, skin-like blend of a cream. These are also excellent for travel because they resist melting in warm weather far better than pure cream formulas.
Shimmer, Satin, or Matte
Finish is the other axis you will need to consider. Matte bronzers are the most forgiving and versatile because they mimic the natural shadow the sun would create, making them ideal for contouring and for giving structure to a soft, rounded face. Satin finishes sit in the middle, offering a healthy, skin-like luminosity without glitter. Shimmer bronzers contain higher levels of mica and are best reserved for summer looks, body application, or strategic placement on the very tops of the cheekbones for a gleaming finish. A common mistake is using shimmer bronzer as a general all-over face warmer, which can emphasise texture and pores, especially on camera or in harsh lighting.
How to Choose the Perfect Bronzing Stick for Your Skin Tone
Choosing the right bronzer is the single most important decision you will make with this product, because the wrong shade will read as either orange, muddy, or ashy no matter how skilfully you blend it. The guiding principle is to select a shade that is one to two tones deeper than your natural skin and that harmonises with your undertone.
For fair skin with cool or pink undertones, look for bronzers in soft peach, light honey, or rosy caramel. Avoid anything too orange or golden because it will look muddy against cool skin. Brands often label these as “light” or “fair to light” shades. For fair- to medium-skinned people with neutral undertones, golden-beige bronzers with a hint of warmth flatter beautifully. Avoid overly red or terracotta tones, which can look sunburnt rather than sun-kissed.
Medium skin with olive or warm undertones is incredibly versatile and can handle rich caramel, amber, and warm bronze tones. These skin tones should avoid cool-toned contour shades, which can look grey. Tan skin benefits from deeper terracotta, cinnamon, and warm copper shades, which enhance the natural warmth of the complexion without overwhelming it. Deep skin, which often has rich red, blue, or ebony undertones, looks stunning in warm espresso, deep bronze, and mahogany shades. Shimmer bronzers with copper or gold pearl can be particularly beautiful on deep skin because they illuminate without washing out the natural richness of the complexion.
A reliable test when shopping for a new bronzer is to swatch it on your jawline in natural daylight. If it blends seamlessly into the skin and looks like a shadow, it is the right depth. If it looks stark, orange, or grey, it is the wrong shade. Many brands now offer shade-matching tools online, but nothing replaces the accuracy of a daylight test.
Undertone Decoded
If you are unsure of your undertone, check the veins on the inside of your wrist. Blue or purple veins typically indicate cool undertones; greenish veins suggest warm undertones, and a mix of both points to neutral. Another helpful clue is how your skin reacts to the sun. Skin that burns easily tends to be cool-toned, skin that tans readily tends to be warm, and skin that does a bit of both is neutral. Matching your bronzer to your undertone rather than fighting against it is the quickest path to a believable, natural-looking glow.
Prepping Your Skin for Flawless Application
The difference between a bronzer that melts into the skin and one that sits in patches often comes down to skin prep. Cream products cling best to a smooth, hydrated, slightly tacky surface, so your skincare routine is the foundation on which the rest of the look is built. Start with a gentle cleanser that suits your skin type, followed by a hydrating toner or essence to rebalance the skin after washing.
Moisturiser is essential, even for oily skin, because dehydrated skin grips pigment unevenly and creates patchiness. Choose a moisturiser that matches your skin type, whether that is a lightweight gel for oily skin, a rich cream for dry skin, or a balanced lotion for combination skin. Allow the moisturiser to fully absorb for at least two to three minutes before moving on, because applying product over tacky moisturiser will cause pilling.
Sunscreen is non-negotiable. Dermatologists across the board recommend a broad-spectrum SPF of at least thirty daily, applied as the final step of skincare. Sunscreen prevents the very hyperpigmentation and uneven tone that many of us use bronzer to disguise, so skipping it defeats the long-term goal of healthy, even skin. Let the sunscreen set for another two to three minutes before moving to makeup.
Primer is optional but helpful for certain skin types. A blurring primer smooths texture and helps bronzer glide, while a hydrating primer adds extra slip for dry skin. If your foundation will be cream or liquid, apply it now, blending with a damp sponge or a dense brush until it looks seamless. Avoid powdering the face before applying bronzer because cream products do not blend well over set powder. If you must set certain areas, such as the under-eye, do so only after the bronzer is in place.
Step-by-Step: How to Apply a Bronzing Stick Like a Pro
Now comes the part where art meets technique. The placement of bronzer is what separates a believable, sun-kissed finish from an obviously made-up face. Professional makeup artists follow a map based on how sunlight naturally hits the features, and this map has remained remarkably consistent across decades of beauty evolution.
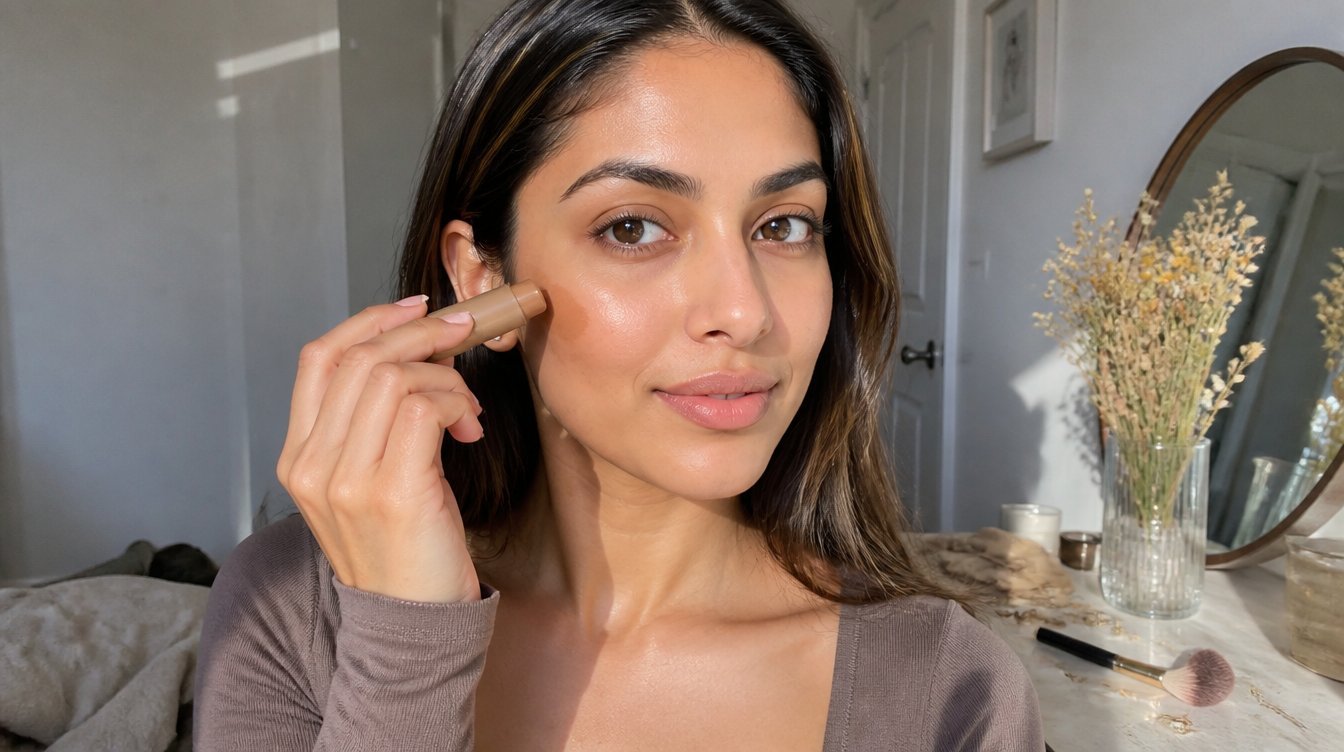
Begin by twisting the stick up just enough to expose a small amount of product. You want control, not a huge deposit of pigment. Gently swipe the stick directly onto the skin in three key zones. First, draw a soft line along the top of each cheekbone, starting from the temple and sweeping down toward the middle of the ear. Second, apply a small amount across the forehead, concentrating near the hairline. Third, add a dot or two along the bridge of the nose and along the jawline and a light touch under the chin.
Once the product is placed, it is time to blend. The tool you use matters. For the most seamless, skin-like finish, use your fingertips. The warmth of your skin melts the product and presses it into the complexion in a way no brush can replicate. For more controlled blending, use a dense synthetic brush or a damp makeup sponge in a stippling motion. Avoid dragging the product, which can create streaks and disturb your base. Instead, tap and press until there are no visible edges.
Work in thin layers and build gradually. The most common mistake is applying too much product in one swipe. You can always add more, but removing excess bronzer without disturbing your foundation is nearly impossible. After the first layer, assess it in natural light or a daylight-balanced bulb. If you want more depth, go in with a second light layer in the same areas.
Sculpting Different Face Shapes
Beyond the basic map, the way you place your bronzer should honour your unique face shape. Round faces benefit from bronzer placed more vertically along the sides of the forehead and along the hollows of the cheeks to create the illusion of length. Square faces soften beautifully when bronzer is blended along the angles of the jaw and along the hairline at the corners of the forehead. Heart-shaped faces look balanced when bronzer is concentrated along the lower jaw and the temples, drawing the eye away from a pointed chin. Long or oblong faces benefit from bronzer placed horizontally across the forehead near the hairline and along the underside of the chin, which visually shortens the face.
The Three-Shape Technique
A popular method among makeup artists is the three-shape technique. Starting at the temple, draw the number three on each side of the face using the bronzer. The top curve hugs the forehead near the hairline, the middle curve dips into the hollow of the cheekbone, and the bottom curve follows the jawline. When blended, this traces exactly where natural shadow falls and creates a beautifully sculpted effect. It takes practice, but once mastered, it becomes second nature.
Common Bronzing Stick Mistakes and How to Fix Them
Even the most beautiful formula cannot save a face from application errors, and a handful of mistakes come up repeatedly. The first is choosing a shade that is too dark. Beginners often reach for richer shades thinking they will give more impact, but a bronzer that is more than two shades deeper than your natural skin will look like a stripe rather than a shadow. If you find yourself reaching for a dark shade, ask whether it actually flatters your complexion in daylight.
The second mistake is placement that is too low or too harsh. Bronzer should hug the upper half of the cheekbone and fade out before reaching the apples of the cheeks, which should be reserved for blush. Placing bronzer too low can drag the features downward, creating a gaunt or aged effect. Keep the product above an imaginary diagonal line from the top of the ear to the corner of the mouth.
The third mistake is under-blending. Visible edges or streaks instantly announce that the product is makeup rather than natural warmth. Always blend for longer than you think is necessary, checking in multiple lighting conditions before deciding the look is finished. The fourth mistake is layering bronzer over heavy powder, which leads to patchiness and uneven colour. Cream on cream, powder on powder, and cream before powder are the orders to remember.
Another common error is forgetting the neck. A beautifully bronzed face perched on a pale neck looks disjointed and obviously made-up. Take a small amount of leftover product and blend it down along the jawline and onto the neck and décolletage for cohesion. Finally, many people forget to set bronzer in oily areas. If you have oily skin or are wearing the look for a long day, a light dusting of translucent powder over the bronzer in the T-zone will lock the colour in place without dulling the glow elsewhere.
Pairing Bronzer With Blush, Highlighter, and Other Makeup
A bronzing stick rarely lives alone in a makeup routine. Knowing how to layer it with blush, highlighter, and setting products creates a harmonious, dimensional finish. When using all cream products, apply them in this order: foundation or tinted moisturiser, concealer, bronzer, blush, and highlighter; then set with powder only where needed. Layering creams in this order allows each product to blend into the one below without disturbing it.
Blush should be placed on the apples of the cheeks, which are the roundest part that pops forward when you smile. Because bronzer lies slightly above and behind the apples, the two products should meet and blend at the edges but not overlap heavily. A subtle diffusion between the two creates the most natural, lifted effect. Choose a blush shade that harmonises with your bronzer. Warm peach or terracotta blushes pair beautifully with warm bronze, while soft rose or berry blushes balance neutral bronzers nicely.
Highlighter, whether cream or powder, should be placed on the very tops of the cheekbones, just above the bronzer. This layering creates the illusion of a lifted cheekbone catching the light. A small amount on the bow of the lip, the inner corners of the eyes, and the bridge of the nose adds further dimension. Avoid highlighting the forehead or chin, which can make those areas look shiny rather than luminous.
For the eyes, using your bronzing stick as a crease colour creates a cohesive monochromatic look. Dab a small amount into the crease and blend with a fluffy brush for a soft, diffused wash of warmth. On the lips, a nude lip with a warm undertone pairs beautifully with a bronzed face, while a glossy peach or caramel lip pushes the look fully into sunset territory.
Bronzing Sticks for Every Season and Occasion
One of the most versatile qualities of a bronzing stick is its adaptability. The same product can take you from a subtle office day to a full vacation glow simply by adjusting how much you apply and how you pair it. For everyday wear, keep the application light, focused on the cheekbones and whispered across the forehead. Pair with tinted moisturiser and a tinted lip balm for a polished but effortless finish.
For a workday or evening out, build the bronzer in thin layers for more definition. Add a defined eye, a bolder lip, and a proper highlighter for a more structured look. For summer vacations, amp up the glow. Use a shimmer-finish bronzer along the cheekbones and collarbones, skip heavy foundation in favour of a tinted SPF, and let the bronzer do the heavy lifting. The effect is bare, luminous skin that reads as recently sunned without any actual UV damage.
Winter is often when the bronzer becomes most useful. The pale, flat look that many of us develop in low-light months can be transformed instantly with a warm bronzer, even if the rest of the face remains minimal. A dusting of bronzer across the forehead, cheekbones, and chin bridges the gap between pale winter skin and the rosy glow of spring. Bridal makeup also relies heavily on bronzer because wedding photography benefits enormously from added dimension; a flat base washes out under photography lights, while a softly bronzed face photographs with vitality and warmth.
Bronzing Stick Tips for Mature Skin
Mature skin has unique considerations when it comes to bronzer, and cream formulas are almost always the right choice because they add moisture and flexibility. Avoid heavy shimmer, which can settle into fine lines and emphasise texture. Instead, opt for satin finishes that give a soft glow without accentuating crepiness. Apply with fingertips rather than a brush to warm the product and melt it into the skin, and use a light hand because pigment appears more concentrated on thinner, mature skin.
Focus bronzer on the upper face, including the cheekbones and temples, to draw the eye upward and counter any downward pull that comes with age. Avoid heavy application along the jawline, which can emphasise laxity rather than sculpt it. Pair with a moisturising foundation, a cream blush, and a hydrating setting spray rather than heavy powder. The goal is dewy, dimensional skin that looks healthy rather than heavily made up.
Ingredients to Seek Out and Ingredients to Avoid
Because bronzing sticks sit on the skin for hours at a time, ingredient quality matters. Seek formulas that include nourishing emollients such as jojoba oil, squalane, shea butter, and plant-derived waxes. These support the skin barrier while delivering colour. Antioxidants like vitamin E, green tea extract, and rosehip oil add a protective layer against environmental stressors, which is especially valuable for anyone who wears makeup outdoors.
Avoid formulas heavy in synthetic fragrance, which can irritate sensitive skin and trigger contact dermatitis. Mineral oil and heavy silicones are not inherently harmful, but they can clog pores for some skin types, so those prone to breakouts may want to choose non-comedogenic formulas. Look for brands that disclose their full ingredient list and, where possible, use clean colour pigments that are responsibly sourced. Mica, in particular, has historically been associated with problematic sourcing practices, so ethically certified mica is worth seeking out in premium brands.
Those with acne-prone skin should look for formulas labelled ‘non-comedogenic’ and should ensure they cleanse thoroughly at the end of the day to prevent clogged pores. Those with sensitive skin should patch-test any new product on the inner forearm for forty-eight hours before applying to the face, especially if the formula contains new pigments or active ingredients.
Storing and Extending the Life of Your Bronzing Stick
Like all cosmetics, bronzing sticks have a shelf life, typically twelve to eighteen months once opened. Heat is the primary enemy of cream formulas because it can cause the wax and oil to separate, altering the texture and performance of the product. Keep your bronzing stick in a cool, dry place, away from direct sunlight and away from the bathroom if possible, because humidity accelerates degradation.
Clean the tip of the stick regularly with a tissue or a gentle micellar-dampened cotton pad to remove buildup of oils, foundation, and dead skin. This prevents bacterial growth and keeps the application smooth. Always close the cap tightly after use, because exposure to air dries out the surface of the product and causes the pigment to crumble. If you notice a change in smell, texture, or colour, it is time to replace the product, regardless of how much is left.
Frequently Asked Questions About Bronzing Sticks
Can I use a bronzing stick without foundation? Absolutely, and many people prefer this minimalist approach. Start with clean, moisturised skin topped with sunscreen. Apply concealer only where you need coverage, then apply the bronzing stick to the high points of the face where the sun would naturally hit. Blend with fingertips for the most seamless finish. This creates a barely-there, lit-from-within glow that is perfect for casual days, beach settings, or a no-makeup-makeup look. The key is ensuring your skin is well-hydrated beforehand so the product blends rather than patches up.
What is the difference between a bronzing stick and a contour stick? The two products look similar but serve different purposes. A bronzing stick is warm-toned, pulling from golden, amber, and terracotta shades, and is designed to mimic the colour the sun naturally gives the skin. A contour stick is cool-toned, pulling from taupe and grey-brown shades, and is designed to mimic shadow. Bronzer goes on the high points of the face where the sun would hit, while contour goes into the hollows, such as beneath the cheekbones or along the sides of the nose. Many looks benefit from using both, but they are not interchangeable.
How do I prevent my bronzing stick from looking patchy? Patchiness almost always traces back to skin prep or blending technique. Ensure your skin is well-moisturised and that any moisturiser or sunscreen has fully absorbed before applying make-up. Apply foundation, if using, in a thin, even layer. Work quickly when applying the stick because cream formulas set once they contact the skin and blend immediately with warm fingertips or a damp sponge. Avoid applying bronzer over heavy powder, which causes the product to grab unevenly. If you do develop patches, dampen a sponge and gently press over the area to redistribute the pigment.
Can bronzing sticks be used on the body? Yes, and many makeup artists use them precisely this way on shoulders, collarbones, and legs. A light application along the collarbones creates a flattering sun-kissed effect under open necklines, and blending a small amount down the shins can give the illusion of longer, more sculpted legs. Just be mindful of transfer onto clothing, and consider setting body application with a light dusting of powder or a setting spray for longevity.
Is a bronzing stick suitable for oily skin? Yes, but formula choice matters. Oily skin types do best with balm-to-powder formulas that set to a velvety finish rather than remaining wet. Apply a mattifying primer beforehand, use the bronzer sparingly, and set the T-zone with a light, translucent powder. Avoid shimmer-heavy formulas, which can emphasise shine and make oily areas look even more reflective. Gel-based bronzing sticks are another excellent option because they tend to dry down quickly and resist transfer.
How much bronzer is too much? The rule of thumb is that if someone can tell you are wearing bronzer, you are wearing too much. The goal is the illusion of natural warmth, so the product should blend into the skin rather than announce itself. If in doubt, apply less than you think you need and build gradually. View your look in natural daylight, not just bathroom lighting, because artificial light often masks heavy application. If you look noticeably warmer from a distance, but the specific placement of the product is invisible up close, you have found the right amount.
Should I apply bronzer before or after blush? Apply bronzer first, then blush on top. Bronzer sets the warm, shadowy foundation, and blush adds a pop of life on the apples of the cheeks. Applying blush first can result in bronzer muddying the fresh colour of the blush, whereas layering blush over a base of bronzer creates a soft, diffused, dimensional finish. With cream products, this layering requires quick work because the bronzer sets once it touches the skin, so apply blush while the bronzer is still blendable.
Do bronzing sticks work on deep skin tones? Yes, though shade selection is critical. Deep skin tones can look stunning with rich copper, mahogany, and warm espresso bronzers. Avoid shades that are too light, which can create an ashy or grey cast, and avoid anything too orange, which can look unnatural. Shimmer bronzers with gold or copper pearl tend to be especially flattering on deep skin because they illuminate without dulling the natural richness of the complexion. Brands have expanded their deep shade ranges significantly in recent years, so explore options until you find a shade that disappears seamlessly into your skin.
Bringing It All Together
The journey to mastering a bronzing stick is really a journey toward understanding your own face and how light, colour, and dimension play across it. What begins as a simple twist-up product becomes, with a little practice, a tool capable of reshaping your features, warming your complexion, and adding the kind of polish that used to require a kit full of separate products. The secret is never in the product alone but in how thoughtfully you choose your shade, prepare your skin, place your pigment, and blend until the edges vanish.
Start with the basics. Find a shade that flatters your undertone and is no more than two tones deeper than your natural skin. Choose a formula that suits your skin type, whether that is a classic cream for dry skin, a balm-to-powder hybrid for oily skin, or a sheer gel for a no-makeup effect. Prep your skin with hydration and sunscreen, then apply the bronzer to the high points of the face where the sun would naturally hit. Blend with warm fingertips or a damp sponge, build slowly, and check your work in daylight.
As you grow more confident, experiment with the three-shape technique, with layering cream blush and highlighter over your bronzer, and with using the product as a crease shadow or a subtle lip warmer. Take note of which placements flatter your face shape and which feel heavy. Over time, your bronzing stick will stop feeling like a product you have to think about and start feeling like an extension of your own fingers, a tool you reach for automatically whenever you want to look like the most radiant version of yourself. The sun-kissed glow you once associated with lazy beach afternoons is now waiting in your makeup bag, clean, safe, and endlessly renewable, ready to bring warmth and life to your face in every season of the year.
RELATED ARTICLES:
Contouring and Bronzing: When and Where Should You Apply Each?
The Biggest Makeup Trends to Watch Out For in 2026
Say Goodbye to Summer Breakouts with These Skin-Friendly Foods
Beat the Heat: Sweatproof Makeup Hacks Every Woman Needs This Summer
Long-Lasting Summer Makeup: Avoid Melting with These Pro Sweatproof Hacks
COMMENTS