
Aura nail art is the dreamy blurred gradient look that took TikTok by storm in 2024 and has stayed in trend cycles ever since because it photographs b
Aura nail art is the dreamy blurred gradient look that took TikTok by storm in 2024 and has stayed in trend cycles ever since because it photographs beautifully and works on any nail length. Aura nail art creates a soft, glowing halo of color in the center of each nail, and it is far easier to recreate at home than the polished results suggest. This guide walks through aura nail art step by step with the brushes, the polish layering, and the color combinations that look genuinely pro.
Reviewed by the BeautynFacts editorial team. Last updated: May 2026.
Aura Nail Art: How to Create the Blurred Gradient Nail Trend
Few nail trends have captured the internet’s attention quite like the soft, luminous glow of aura nail art. This dreamy, diffused gradient technique transforms a plain nail into something that looks lit from within. The blurred halo of colour at the centre fades organically toward the edges, mimicking the soft aura of light around a candle flame or the glow of neon through fog. The result is simultaneously effortless and striking.
The trend rose sharply in popularity alongside the broader Y2K beauty revival, but it has developed a life of its own. It sits at the intersection of minimal and artistic, making it wearable for everyday life and elevated enough for special occasions. Most importantly, it is not reserved for professionals. With the right tools, a steady hand, and a clear understanding of the technique, anyone can achieve this look at home.
This guide covers everything you need to know. You will learn what distinguishes Aura Nails from other gradient techniques, how to prepare your nails properly before you start, which products and tools to use, how to execute the technique step by step, how it adapts across different nail product types, including gel, acrylic, dip powder, and regular polish, and how to care for your nails throughout the process. You will also find a detailed troubleshooting section and answers to the most common questions.
What Is Aura Nail Art?
The Origins of the Trend
Aura nail art emerged as part of a broader wave of soft-focus, ethereal aesthetics that took hold in beauty culture in the early 2020s. The “aura” concept itself draws from spiritual and visual art traditions, where an aura refers to the luminous glow believed to radiate from a person or object. Applied to nails, that idea translates into a circular bloom of colour that seems to emanate from the nail’s centre rather than sitting flat on the surface.
The trend gained significant traction on platforms like TikTok and Instagram, where short videos showed the surprisingly simple sponge-dabbing technique producing near-magical results. Beauty creators quickly began experimenting with colour combinations, layering chrome powders, holographic pigments, and pastel shades to push the aesthetic further.
The Y2K revival contributed to its rise because aura nails share visual DNA with the pearlescent, iridescent finishes that defined late 1990s and early 2000s beauty. However, unlike those trends, aura nails feel modern and refined rather than nostalgic, which explains their staying power beyond a single trend cycle.
How It Differs from Ombré and Gradient Nails
Ombre nails blend two colours from one end of the nail to the other in a linear progression. The transition moves from tip to base or side to side in a relatively structured path. Aura nails work differently. The colour originates at the centre of the nail, typically in a concentrated oval or circular patch, and radiates outward in all directions before fading into the base colour or bare nail.
This radial, centred gradient is what gives aura nails their distinctive look. The effect is softer and more dimensional than standard ombre because the edges of the gradient are deliberately diffused rather than blended in a clean sweep. There is no hard line at any point. Every edge dissolves into the base, which creates the illusion of depth and glow.
French tips follow a defined margin. Ombre follows a linear path. Aura nails follow no straight lines at all, which is precisely what makes them look organic and light-infused rather than painted.
Nail Lengths and Shapes That Suit the Look
Aura nail art works across all nail lengths, but it reads most clearly on short to medium lengths. On shorter nails, the gradient fills the entire visible surface of the nail, making the aura effect immediate and bold. On longer nails, the gradient can be applied more softly, creating a subtler glow effect that allows the length itself to remain the focal point.
In terms of shape, oval, round, and almond nails complement aura art naturally. Their curved silhouettes echo the circular nature of the gradient. Square and squoval nails also work well, offering a more structured frame for the soft interior gradient, which creates an interesting visual contrast. Stiletto and coffin shapes suit bold, saturated aura applications where the gradient is vibrant and intentional rather than soft and washed-out.
Nail Health and Preparation Before You Start
Hydration and Cuticle Care
Healthy nails accept polish better and hold any nail art technique longer. Before you begin any nail art application, your nails and the surrounding skin need proper preparation. Hydration is the first priority.
Dry, brittle nails are more prone to chipping and peeling, which shortens the life of any nail application. Apply a dedicated nail oil or cuticle oil daily, particularly in the days leading up to your nail art session. Look for oils containing jojoba, vitamin E, or sweet almond oil. These penetrate both the cuticle and the nail plate, improving flexibility and moisture levels.
Cuticles that are dry or overgrown can lift at the base of the nail, causing polish to peel prematurely. Push cuticles back gently using a rubber cuticle pusher after soaking your hands in warm water for three to five minutes. Avoid cutting cuticles unless you have professional experience. The cuticle acts as a protective seal against bacteria and infection. Cutting it aggressively increases your risk of irritation, inflammation, or infection.
Strengthening Weak or Brittle Nails
Weak nails have a harder time holding up under repeated polish applications, especially when those applications involve layering multiple products, as Aura Nails do. If your nails split, peel, or break easily, address that before committing to nail art.
Nail hardeners formulated with keratin, calcium, or hydrolysed wheat protein can help rebuild nail strength over several weeks of consistent use. Apply them as a base coat on bare nails between manicures. Avoid products containing formaldehyde, which was once a common hardening agent but is now known to cause brittleness with long-term use.
Biotin supplementation has research-backed support for improving nail thickness in people with brittle nail syndrome. A daily dose of 2.5 mg is the amount studied in clinical trials. Results typically appear after three to six months of consistent use. Adequate protein intake also supports keratin production, which is the structural protein your nails are made of.
Common Nail Conditions to Know
Several nail conditions can affect how your aura nail art applies and wears. Identifying them helps you adapt your technique and avoid worsening existing issues.
Onycholysis is the separation of the nail plate from the nail bed, typically beginning at the tip. It can result from aggressive filing, overexposure to water, or allergic reactions to nail products. If you notice pale, opaque areas where the nail is lifting, avoid layering heavy polish or gel over that area. Allow the nail to grow out naturally and keep it moisturised.
Ridges running vertically along the nail are common and usually harmless, associated with aging and mild dehydration. Use a ridge-filling base coat before your nail art to create a smooth surface that allows the gradient to look even. Horizontal ridges, called Beau’s lines, can indicate a past illness or nutritional deficiency and are worth mentioning to a doctor.
White spots on nails, often mistakenly attributed to calcium deficiency, are usually caused by minor trauma to the nail matrix. They grow out over time and do not require treatment. They will not affect your nail art application.
Tools and Products You Need
Sponges, Brushes, and Applicators
The makeup sponge is the single most important tool in the Aura nail art technique. It is the instrument that creates the blurred, stippled effect that defines the look. Several sponge types work well.
Cosmetic wedge sponges are the most accessible option. Cut them into small sections roughly the size of a fingertip. The cut edge creates an irregular surface that deposits colour unevenly, which actually helps produce a more organic gradient. Nail art ombre sponges are purpose-built for this type of work and typically have a denser, more consistent texture that gives you greater control over colour placement.
A makeup blending sponge cut into pieces also works, though its softer, airier texture produces a lighter, more diffused application. This works particularly well for very soft, barely-there aura effects where you want only a hint of colour in the centre.
A thin nail art detail brush is useful for cleanup around the edges of the nail after sponging. An angled cleanup brush loaded with acetone lets you remove excess polish from skin and cuticle lines with precision. A standard round toothpick can also be used to clean up small mistakes before the polish sets fully.
Choosing the Right Polish Formula
Regular nail polish is the easiest formula to work with for aura nail art at home. It remains workable for several minutes after application to the sponge, giving you time to dab, build, and adjust the gradient before it sets. Choose a formula that is not too thick or goopy. Thicker polishes tend to clump on the sponge and deposit unevenly on the nail.
Gel polish produces a longer-lasting and more vibrant aura effect, but it requires a UV or LED lamp and a slightly different technique. Because gel polish does not air-dry, you have more time to work with it. However, you must cure each layer fully before adding another, which means the sponge application needs to happen in thin, controlled steps with a cure between each pass.
Chrome powders and holographic pigments applied over a sticky gel layer produce some of the most visually striking aura effects. The powder adheres only where the gel surface is tacky, which allows you to buff it onto the centre of the nail with a silicone or felt applicator for a radiant, metallic glow effect.
Dip powder and acrylic systems do not lend themselves to the sponge technique in the same way, but they can achieve aura effects through specialised application methods, which are covered in detail later in this guide.
Essential Extras: Topcoat, Cleanup Tools, and Base Coat
A high-shine topcoat is non-negotiable for aura nails. It seals the gradient, smooths any texture from the sponge application, and adds the glass-like finish that makes the look truly luminous. Apply it carefully over the entire nail without flooding the cuticle. Reapply every two to three days to extend the life of the manicure and maintain the shine.
A ridge-filling or strengthening base coat applied before your polish protects your natural nail and creates a uniform surface for the gradient to sit on. Never skip the base coat. Direct contact between pigmented polish and the nail plate over extended periods causes yellowing and staining that is difficult to remove.
A liquid latex peel-off barrier applied around the cuticle and skin before you sponge significantly reduces cleanup time. It peels away cleanly once the polish is dry, removing any overflow without the need for acetone near the cuticle. This is particularly useful for beginners who are still developing their sponge control.
Step-by-Step: How to Create Aura Nails at Home
Preparing Your Nails
Start with clean, dry nails. Remove any existing polish with an acetone-based remover, then wash your hands thoroughly. Residual oils from moisturiser or nail oil will prevent polish from adhering properly, so apply nail art products before any lotion or oil rather than after.
File your nails to your chosen shape using a fine-grit nail file. Always file in one direction rather than sawing back and forth. Sawing creates micro-tears in the nail edge that can lead to peeling and breakage over time. Buff the nail surface lightly to remove any shine and improve polish adhesion. Use a lint-free nail wipe dampened with isopropyl alcohol to clean the nail plate and remove any dust from filing.
Apply a thin, even layer of base coat to all nails. Allow it to dry fully before proceeding. Apply your base colour in two thin coats, allowing the first to dry before adding the second. A sheer, milky, or nude base produces the most authentic aura-glow effect. Bright or dark bases can work for bolder variations, but they require a higher-contrast accent colour to make the gradient visible.
Applying the Base and Building the Gradient
Once your base coats are completely dry, prepare your sponge. Paint a small amount of your accent colour directly onto the surface of the sponge. Load only a small area of the sponge and use more colour toward the centre of the loaded patch, tapering off toward the edges. This uneven loading helps create the natural fade when you transfer the colour to the nail.
Press the sponge onto the centre of the nail with a firm dabbing motion. Do not drag or swipe. Dragging smears the colour and destroys the soft-edge effect. The stippling action of dabbing deposits colour in tiny, irregular dots that blend together visually while keeping the edges naturally diffused.
Lift the sponge and assess the gradient. At this stage it will likely look faint. That is correct. Build gradually. Reload the sponge with a small amount of fresh polish and dab again over the same central area, applying slightly less pressure as you move outward. Three to five layers of light sponge application produce a more dimensional, glowing result than one heavy-handed pass.
Use a detail brush dipped in acetone to clean up any polish that landed on the skin or cuticle line. Work carefully and use light, precise strokes. Allow the cleanup to dry before applying topcoat.
Finishing and Sealing the Look
Apply a generous but controlled layer of high-shine topcoat over the entire nail. Move slowly from base to tip. Make sure the topcoat wraps slightly over the free edge of the nail to seal it against chipping. Avoid going back over areas where the topcoat has already started to set, as this can drag the gradient beneath.
Allow the topcoat to dry undisturbed for at least ten minutes before touching anything. For gel topcoat, cure under your lamp for the full time specified by the manufacturer, typically 60 seconds under LED and 120 seconds under UV.
Finish with a drop of cuticle oil on each nail and massage it gently into the surrounding skin. This restores moisture to the cuticle area that the isopropyl alcohol and acetone from cleanup may have stripped away.
Aura Nail Art Across Different Product Types
Regular Polish Aura Nails
Regular nail polish is the most beginner-friendly formula for aura nail art. It dries at room temperature, does not require any equipment beyond a sponge and topcoat, and is easy to remove if something goes wrong. The learning curve is gentle because mistakes can be wiped away before the polish fully sets.
One limitation of regular polish for this technique is wear time. A sponge-applied regular polish aura manicure typically lasts five to seven days before it begins chipping at the tips. Applying a layer of topcoat every two to three days extends this. Glitter-finish polishes used as accent colours in aura applications can be harder to remove later and may require longer soak times with acetone.
For best results with regular polish, choose a formula labelled “3-free” or higher, meaning it is free from the most harmful chemical additives, including dibutyl phthalate, toluene, and formaldehyde. These formulas are safer for frequent use and gentler on the nail plate.
Gel Aura Nails
Gel polish produces a more vibrant, longer-lasting aura effect and is the preferred choice for professional nail artists. The colours are richer, the finish is more glass-like, and the result can last two to three weeks without significant chipping when properly applied and sealed.
The technique differs slightly from regular polish. After applying and curing your gel base coat and base colour, apply your accent gel colour to the sponge and dab it onto the nail. Cure the first sponge layer for 60 seconds under LED before adding additional layers. Curing between passes prevents the colour from spreading or becoming muddy.
Gel removal requires soaking the nails in acetone. Never peel or force gel polish off the nail. Peeling removes layers of the actual nail plate along with the gel, leaving nails thin, weak, and prone to breaking. To remove properly, file the surface of the gel lightly to break the seal, soak a small cotton pad in acetone, place it on the nail, wrap the fingertip in foil, and wait 10 to 15 minutes. The gel should lift easily with gentle pressure from an orange stick. Never scrape with metal tools, as this scratches the nail plate.
Dip Powder and Acrylic Aura Nails
Dip powder and acrylic systems create a hard, durable nail surface that is fundamentally different in texture from polish-based systems. The sponge technique does not apply directly to these formulas, but aura effects can still be achieved through alternative methods.
For dip powder, a two-colour aura effect is created by first dipping the nail in the base colour, then using a small brush to apply the accent powder in a concentrated oval at the centre of the nail before the bonding liquid fully sets. This requires practice and speed, as dip systems set quickly. Some professional nail technicians use an airbrush tool over a cured dip base to create the gradient effect with precision before sealing with dip topcoat.
Acrylic nails can be sculpted with two-tone or ombre acrylic mixes where the accent colour is concentrated in the centre of the nail form and blended outward while the acrylic is still workable. This technique is difficult to execute without professional training and is not recommended for home application. However, a regular polish aura effect applied over a completed acrylic set works extremely well and is a popular salon service.
Removal of dip powder and acrylic requires soaking in 100% pure acetone for 15 to 20 minutes. Dip powder typically dissolves more readily than acrylic. Do not attempt to pry or force either product off the nail. Use gentle, patient soaking and an orange stick to ease away softened product. Follow removal with thorough moisturising of the nail and cuticle area.
Color Combinations and Aesthetic Pairings
Soft and Dreamy Palettes
The most popular aura nail colour combinations lean toward the soft, ethereal end of the spectrum. These palettes feel wearable and versatile, complementing a wide range of skin tones and outfit choices.
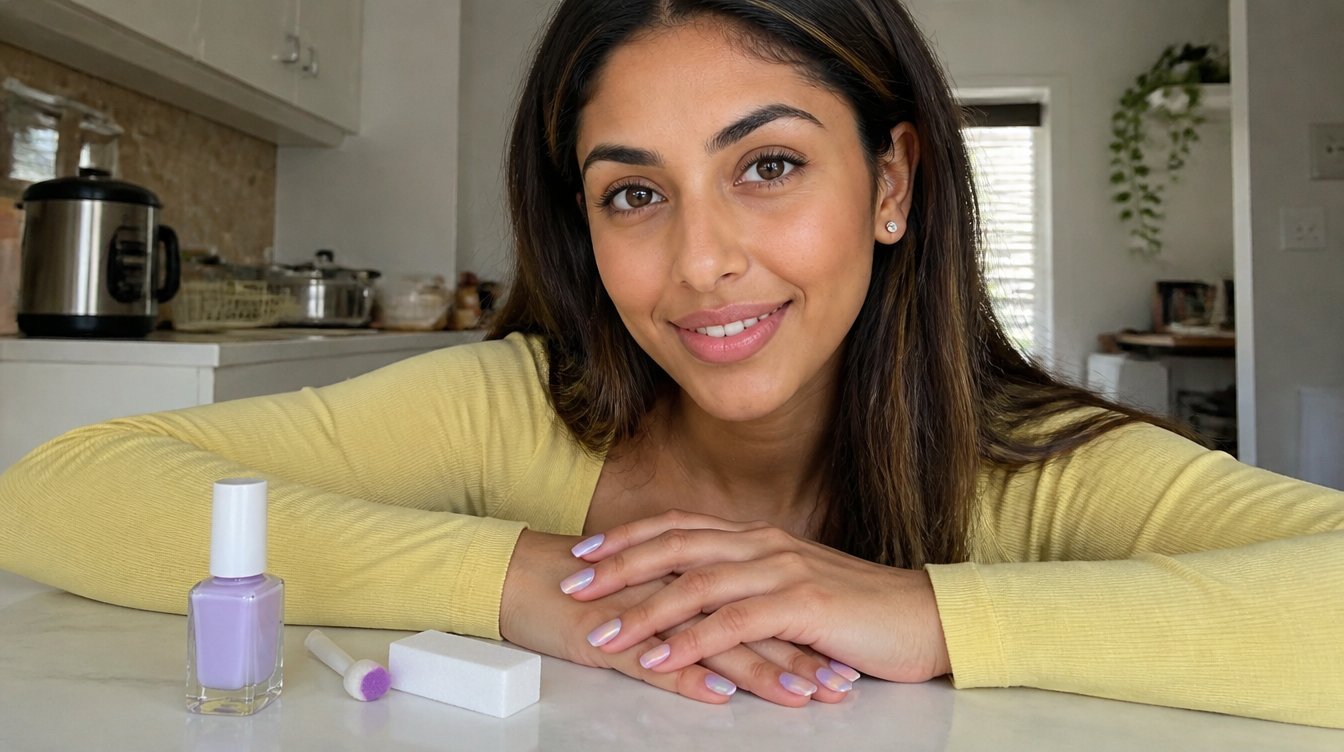
Lavender over white or cream is the defining aura nail combination. The purple hue creates a soft, violet glow at the centre that fades into the pale base, referencing the visual warmth of light through mist. Sage green over ivory, peach or coral over nude, and baby blue over sheer white follow the same logic and produce equally delicate results.
For a more romantic variation, try dusty rose over a slightly warmer, peachy nude base. The gradient reads as very natural from a distance while still delivering visual interest up close. This variation works particularly well on shorter nail lengths and natural nail shapes.
Bold and Chrome Variations
Bolder aura nail variations use saturated, high-contrast colours or speciality finishes to create a more dramatic gradient. These work best on medium to longer nail lengths where the surface area allows the gradient to develop fully.
Chrome powder applied over a gel base coat before curing creates a mirror-like metallic aura at the centre of the nail that reflects light intensely. Rose gold chrome over a sheer pink gel base is particularly popular. Silver chrome over pure white creates an icy, otherworldly effect. Holographic pigments produce a rainbow shift when the nail moves under light, making the aura appear to change colour.
Deep jewel tones like violet, teal, and cobalt used as accent colours over a black or very dark base create a dramatic inverse aura where the centre glows against a dark field. This variation reads as bold and editorial rather than soft and romantic, making it a strong choice for evening occasions.
Seasonal Color Ideas
Aura nail art adapts naturally to seasonal palettes. In spring, mint green over white and lilac over cream feel fresh and botanical. Summer calls for coral, warm yellow, and sky blue over nude bases. Autumn aura nails look striking in burnt orange or terracotta over a warm beige base or deep plum over cream. In winter, icy blue over white, silver chrome over sheer, and deep burgundy over a dusty rose base all capture a cold, luminous quality.
Holiday occasions offer an opportunity to incorporate glitter. Fine champagne or gold glitter mixed with a clear topcoat applied with a sponge over a cured base creates a sparkling aura gradient with a festive feel that is still subtle enough for daytime wear.
Nail Removal and Aftercare Safety
Safe Removal by Product Type
Removing nail products safely is as important as applying them correctly. Improper removal is the leading cause of nail damage in people who regularly wear nail art.
Regular nail polish removes easily with an acetone or non-acetone remover. Non-acetone removers are gentler on the surrounding skin and cuticle but may require more effort to remove glitter or darker pigments fully. Soak a cotton pad, hold it against the nail for 10 to 15 seconds, then wipe away. Avoid aggressive rubbing, which strips moisture from the nail surface.
Gel polish removal requires acetone soaking as described earlier. Do not rush this process. If the gel is not lifting easily after 15 minutes, re-wrap and wait another five minutes. Patience during removal protects the nail plate from mechanical damage.
Dip powder removal follows the same acetone soak method. Some dip formulas dissolve in 10 minutes; others take closer to 20. If you find that your dip powder is resistant to acetone, it may have been applied with a gel-based bonding agent rather than a traditional dip bonding liquid. In this case, gentle filing to thin the product before soaking speeds the process.
Acrylic removal requires the longest soak time and the most patience. A full soak of 20 to 30 minutes in a bowl of acetone is more effective than the foil wrap method for thick acrylic sets. Keep hands away from open flame during acetone use, as it is highly flammable. Work in a well-ventilated space.
Post-Removal Nail Recovery
After removing any nail product, nails need immediate care. Acetone strips moisture from both the nail plate and the surrounding skin. Begin rehydration the moment removal is complete.
Wash hands gently and dry them thoroughly. Apply a generous amount of cuticle oil to each nail and massage it into the nail plate and surrounding skin for 30 to 60 seconds per hand. Follow immediately with a rich hand cream. Products containing shea butter, glycerin, or urea are particularly effective at restoring moisture quickly.
If your nails feel noticeably thin or flexible after gel or acrylic removal, apply a strengthening base coat and allow your nails to breathe for a minimum of three to seven days before reapplying any product. During this rest period, continue daily cuticle oil application and avoid prolonged water exposure, which further weakens already compromised nails.
When to Rest Your Nails
Continuous nail product use without breaks gradually weakens the nail plate. Nail plates that are repeatedly covered with gel or acrylic without rest periods become increasingly thin, brittle, and prone to breakage. Most nail health professionals recommend taking one to two weeks off from all nail products every two to three months.
During rest periods, keep nails filed to a short, manageable length to prevent breakage. Apply cuticle oil twice daily and wear gloves when washing dishes or cleaning with chemical products. A clear strengthening base coat worn alone during rest periods provides some mechanical protection without the moisture-blocking properties of coloured polish.
Troubleshooting Aura Nails: Common Mistakes and Fixes
Gradient Looks Too Heavy or Muddy
The most common mistake beginners make is loading too much colour onto the sponge. When the sponge carries too much product, it deposits a large, opaque blob of colour rather than a soft, diffused gradient. The aura effect disappears entirely.
Fix this by using far less polish on the sponge than you think you need. After loading the sponge, dab it once on a paper towel before applying it to the nail. This removes excess product and ensures the first application is light. Build up in thin layers rather than trying to achieve full colour intensity in one pass.
If the gradient looks muddy rather than glowing, it usually means the base colour was not fully dry before sponging began. Wet polish mixed with the incoming sponge colour creates a blend rather than a gradient. Always allow your base coats to dry completely. Using a fast-dry topcoat over your base before sponging accelerates this process significantly.
Edges Are Patchy or Uneven
Patchy edges appear when the sponge is pressed unevenly or removed at an angle rather than straight up. They can also result from using a sponge with too large or too irregular a pore structure.
To fix patchy edges, lightly dab over the uneven areas with a barely loaded sponge using very light pressure. This fills in sparse spots without adding too much density. Work in a circular motion around the edge of the gradient to soften any hard lines.
If the patchiness is structural, from the sponge type rather than technique, switch to a finer-textured cosmetic sponge. Dense, fine-pored sponges produce smoother gradients. Coarser, more open-pored sponges create texture that can look intentional in some applications but distracting in others.
Topcoat Smears the Design
Applying topcoat too quickly over a sponge-applied gradient that has not fully dried is a common source of frustration. The brush strokes drag the still-wet accent colour across the nail, smearing the carefully built gradient.
The fix is patience. Allow at least five full minutes of drying time after your final sponge layer before applying topcoat. Apply the topcoat in slow, deliberate strokes, moving from base to tip in a single pass per stroke without going back over an area. For the first coat, use a lighter touch than usual. A second topcoat applied after the first has dried creates a thicker, more protective seal without the risk of smearing.
Using a fast-set topcoat can help if smearing is a recurring issue. These formulas set their surface within 60 seconds of application, reducing the window during which a second topcoat or accidental brush contact can damage the design.
Frequently Asked Questions
How long does aura nail art last?
The longevity of Aura nail art depends on the product used as the base and the gradient. A regular nail polish aura manicure typically lasts five to seven days with proper base coat and topcoat application. Applying a fresh layer of topcoat every two days extends this to seven to ten days. A gel aura manicure sealed with a gel topcoat and properly cured can last two to three weeks with minimal chipping. Daily activities like frequent hand washing, cooking, and typing accelerate wear on any nail product. Applying a topcoat carefully over the free edge of the nail at initial application and again at each touch-up protects the point where chipping typically begins.
Can I do aura nails without a sponge?
Yes, though the result requires more technique. A soft fan brush can create a diffused gradient by feathering diluted polish outward from the centre of the nail. The brush must be nearly dry to achieve the soft edge the sponge creates naturally. A stippling brush, designed for face makeup application, also works and produces a result very close to the sponge technique. Some nail artists use an eye shadow applicator for very small, precise aura applications on short nails. The sponge remains the easiest and most forgiving method for beginners, but these alternatives are effective once you develop a feel for the pressure and product load required.
What nail polish colours work best for aura nails?
Sheer, iridescent, and semi-transparent polishes produce the most authentic aura effect because they allow the base colour to show through the gradient, creating natural depth. Opaque polishes work but require more careful blending to prevent hard edges. The most effective colour combinations use a base that is significantly lighter or more neutral than the accent colour. Pairing colours that are too similar in value makes the gradient invisible. Pairing colours that are complementary on the colour wheel rather than adjacent creates more dynamic contrast. Examples of high-contrast combinations that work well include coral over cream, emerald over pale gold, and navy over icy white. Chrome powders and pigment powders applied over a gel base deliver the most spectacular results regardless of base colour.
Is aura nail art safe for people with sensitive skin or nail allergies?
People with contact allergies to nail products should exercise caution with any nail art technique. Common allergens in nail products include methacrylate compounds found in gel and acrylic systems, formaldehyde-releasing preservatives found in some polishes, and fragrances added to certain nail care products. If you have experienced allergic reactions to nail products in the past, patch testing a new product on the inner arm before full nail application reduces your risk. Regular nail polish formulated without the most common allergens is the safest starting point for people with sensitive skin. Always apply nail products in a well-ventilated space, as the fumes from acetone and certain gel monomers can irritate the respiratory system. If you experience persistent redness, itching, or swelling around the nail following product use, discontinue use and consult a dermatologist.
Can aura nail art be done on natural nails without extensions?
Aura nail art works beautifully on natural nails. In fact, natural nails in good condition are an ideal canvas for this technique because the gradient sits directly on a smooth, flat surface without the variations in height that nail extensions sometimes introduce. Natural nails benefit from careful base coat preparation and a ridge-filling formula if the nail surface is uneven. The key difference when working on natural nails is that you must be mindful of nail health throughout the process. Avoid filing the nail surface too aggressively when prepping. Use a gentle, 100 percent acetone-free remover between manicures to minimise drying. Keep wear time for gel or acrylic products to no more than three weeks at a stretch, and take periodic breaks to allow the nail to recover its natural moisture balance.
Conclusion
Aura nail art rewards patience and a light touch more than any other technique in nail art. The blurred, luminous gradient at the centre of the nail looks complex but relies on a straightforward sponge-dabbing method that anyone can learn with practice. The key principles are consistent across all skill levels: start with a smooth, healthy nail surface, use a well-prepared base, build the gradient in thin layers, clean up carefully, and seal everything with a quality topcoat.
Your nail health underpins everything. Hydrated cuticles, strong nail plates, and proper removal practices extend the life of your manicure and protect your nails from long-term damage. Whether you choose regular polish for a quick weekend look, gel for lasting vibrancy, or dip and acrylic for added durability, understanding how each product type behaves gives you the flexibility to adapt the technique to your lifestyle and skill level.
Colour experimentation is one of the great pleasures of this trend. Start with a soft lavender-over-white combination to learn the technique, then expand into chrome powders, holographic pigments, and deeper jewel tones as your confidence grows. The aura nail trend continues to evolve precisely because it is a framework, not a fixed formula. That flexibility is what makes it one of the most enduring and creative directions in nail art today.
Your next steps: gather your sponge, choose a two-colour palette with clear contrast, prep your nails thoroughly, and work in thin layers. The glow effect you are looking for builds gradually. Give it space to develop, and the result will speak for itself.
RELATED ARTICLES:
Diamond Aura Nails Can Try This Spring
Trendy Wedding Nails 2026: The Ultimate Guide to Fashionable Bridal Manicures
The Influence of Celebrity Nail Trends: Uncovering the Power of A-List Manicures
How to Care for Your Nails in Winter: Tips for Healthy, Beautiful Nails During the Cold Months
10 Nail Care Tips for Stronger, Longer, and Healthier Nails!
COMMENTS