
Brow mapping is the pro technique that finally makes your eyebrows match, using three simple measuring points to guide shape and symmetry. This guid
Brow mapping is the pro technique that finally makes your eyebrows match, using three simple measuring points to guide shape and symmetry. This guide walks you through brow mapping step by step so you can shape, fill, and balance your brows at home.
What Brow Mapping Is and Why It Actually Works
At its core, brow mapping is a measurement-based approach to determining where your eyebrows should begin, where they should peak, and where they should taper off. Rather than following a generic brow stencil or imitating a shape you spotted on a beauty influencer, this technique uses your own facial landmarks as the guide. The nose, the iris, and the outer corner of the eye all serve as reference points that define the ideal brow architecture for your particular face.
The reason this method works so consistently is facial geometry. The human brain is wired to perceive symmetry as attractive and healthy, a response that goes back to evolutionary biology. Faces that appear balanced and proportionate are processed as more appealing, which is why even small asymmetries in the brows can make a face look slightly “off” even when a person cannot pinpoint exactly what is wrong. Brow mapping corrects for these issues by anchoring each brow decision to fixed anatomical reference points rather than freehand estimation.
Professional brow artists have long applied versions of the golden ratio to facial shaping. The golden ratio, approximately 1:1.618, appears throughout nature and architecture as a proportion that the human eye finds harmonious. When applied to facial features, this ratio helps determine how thick or thin a brow should be, how high the arch should sit, and how much tail length flatters versus overwhelms. Brow mapping takes these abstract mathematical principles and translates them into a practical, three-point system anyone can use.
Beyond aesthetics, mapped brows provide a structural advantage. Well-placed brows frame the eyes, draw the gaze upward, and create the visual impression of facial balance. They can make eyes appear larger, foreheads seem more proportionate, and cheekbones look more defined, all without a single stroke of contouring powder. The effect is subtle but powerful, and it explains why a skilled brow shaping can look like a minor facelift.
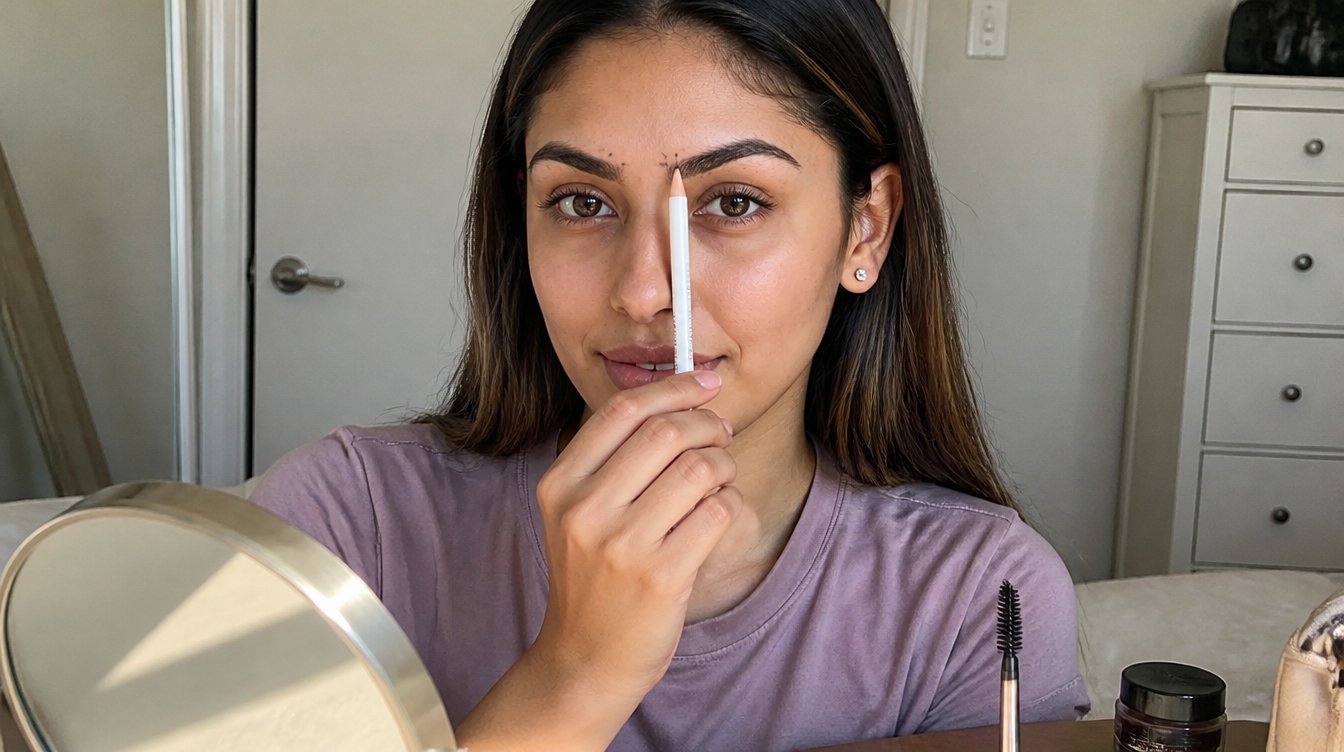
Understanding the Three-Point Method
The three-point method identifies three critical coordinates on the face that dictate the ideal shape of any eyebrow. Each point is determined using a straight edge (typically a brow pencil, brush handle, or mapping string) and your own facial landmarks as guides. These three points are the start, the arch, and the end.
Point One: Where the Brow Begins
The starting point of your brow should align vertically with the outer edge of your nostril. Hold your straight edge vertically along the side of your nose, keeping it flush against the skin. Where it meets the brow bone is precisely where your brow should begin. Hairs that fall inside this line tend to make the nose look wider and the eyes look closer together. Hairs that start too far out can create a gap that makes the face look confused or overly sparse.
Many people are surprised to discover that their natural brows do not start in the right place. Years of over-tweezing, slightly off filling, or simply neglecting brow care can lead to a brow that starts a few millimetres too close to the nose or too far towards the temple. Even a small correction here creates a noticeably more open, balanced look.
Point Two: Where the Arch Peaks
The arch is the most expressive part of the brow, and its position determines whether you look alert and defined or flat and undone. To determine your ideal arch placement, keep your straight edge along the outer nostril and angle it so that it passes through the outer edge of your iris (the coloured part of your eye) when you look straight ahead. Where this angled line intersects the brow bone is your arch point.
The height of the arch is a separate consideration from its horizontal placement. A higher arch creates a more dramatic, lifted look and can add visual height to the upper face. A flatter arch reads as more modern and understated. Neither is objectively better; the key is that the arch should feel intentional and consistent from brow to brow. The three-point method ensures the horizontal placement is symmetrical, while you retain creative control over how much lift you want in the curve itself.
One important distinction: the arch point is not necessarily the highest point on your natural brow. It is the point where the brow begins its downward descent toward the tail. Many people confuse the highest point of the brow hair with the arch anchor point, which leads to shaping that looks rounded rather than structured. The arch in the three-point method refers to the inflection point where the brow changes direction.
Point Three: Where the Brow Ends
The tail of the brow finishes the frame. To determine this point, angle your straightedge from the outer edge of the nostril through the outer corner of your eye (the outer canthus). Where this line meets the brow bone or your existing brow hairs is where the tail should end. If your brow ends before this line, it can make the eye look shorter and the face more pinched. If it extends beyond this line, it may drag the eye downward and visually lengthen the face in a way that can look heavy.
The tail should also sit at or slightly below the height of the brow’s starting point. A tail that climbs too high looks perpetually surprised, while one that dips too steeply below the start can read as sad or droopy. Keeping the tail level with or just slightly below the start point creates a clean, contemporary silhouette.
Tools You Need Before You Start
You do not need a professional brow bar to execute the three-point method accurately. A small collection of affordable tools will serve you well, and once you have them, they last through many mapping sessions.
A long, thin straight edge is your most essential tool. A brow pencil works perfectly because you will likely use it for filling afterwards. A clean makeup brush handle or the edge of a brow ruler also works. Some professionals prefer brow mapping string, a fine cord that can be pressed against the face more precisely than a rigid tool, though a pencil is sufficient for home use.
A white or light-coloured brow pencil or mapping pencil is invaluable for marking your three points directly on the skin before you begin any tweezing or waxing. This step is often skipped at home but is the difference between approximate and precise. Mark each of the three points as small dots on each side of your face before removing a single hair.
A good brow razor or precision tweezers with a slanted tip gives you control over individual hairs. Avoid blunt-tipped tweezers for mapping work, as they tend to grab skin along with hair and make it difficult to target specific strands. A spoolie brush is essential for grooming and blending, both before mapping and after filling. Good lighting, ideally natural daylight or a daylight-spectrum vanity mirror, prevents the colour distortion that bathroom lighting often creates.
If you plan to wax or thread at home, have your preferred product ready but do not apply it until all three points are marked on both sides and checked in the mirror for symmetry. The mapping phase should always be complete before any removal begins.
Step-by-Step Process for All Face Shapes
While the three-point method is consistent, the ideal execution varies slightly depending on face shape. The points themselves are always determined the same way, but understanding how your face shape affects brow proportions helps you make informed choices about arch height, tail length, and overall thickness.
Oval Face Shape
Oval faces are considered the most versatile canvas because the face is roughly 1.5 times longer than it is wide, with a forehead that is slightly wider than the chin and gently curved edges. Almost any brow shape flatters an oval face, which means you have the freedom to choose based on personal preference. A soft, natural arch that follows the three-point method exactly as described above tends to look balanced and proportionate. Oval faces can carry both thicker, fuller brows and more refined, tapered shapes without losing harmony.
Round Face Shape
Round faces are characterised by equal width and length, with full cheeks and a rounded chin. The goal with brow shaping on a round face is to create vertical elongation and definition that the face shape itself does not naturally provide. A higher arch helps considerably here, as it draws the eye upward and creates the illusion of length. Using the three-point method, find your standard arch point and then consider lifting it slightly, keeping the tail clean and slightly extended to pull the eye horizontally. Avoid flat or very round brows, as they echo the face’s roundness and can make it look fuller.
Heart Face Shape
Heart-shaped faces have a wider forehead tapering to a narrower chin, often with a defined widow’s peak. This shape benefits from a softer, rounder arch that draws attention away from the wide forehead rather than emphasising it. A lower arch with slightly more fullness through the body of the brow adds visual weight to the centre of the face and balances the narrower lower half. Avoid very angular or dramatic arches, which can accentuate the forehead’s width. Keep tails from extending too long, as elongated tails visually narrow the upper face more than is flattering.
Square Face Shape
Square faces have a strong jaw, a forehead of similar width, and angular features. The brows here work best when they soften those angles rather than mirror them. A slightly curved, gently arched brow with a rounded peak (rather than a sharp angle) creates contrast against the geometric structure of the face and brings a more harmonious balance. The three-point method will give you the correct placement, but take care when shaping the arch itself: smooth curves rather than sharp peaks make the difference between complementary and clashing.
Long or Oblong Face Shape
Long faces are characterised by a significant difference between facial length and width, with all features arranged vertically. The primary goal here is to interrupt that vertical flow and create the impression of horizontal width. A flatter brow with less arch and more horizontal length tends to achieve this effect beautifully. Using the three-point method, find your natural arch point, but resist the urge to emphasise height. Extend the tail to or just past your mapped end point, and keep thickness relatively consistent through the body of the brow rather than tapering sharply.
Diamond Face Shape
Diamond faces are widest at the cheekbones, with a narrower forehead and chin. Brows on this face shape work best with soft curves and moderate arch height. Because the cheekbones are already the most prominent feature, you want the brows to frame the eyes without competing with that width. Medium thickness and a gentle arch help create visual balance. Avoid overly thin brows, which can make the eyes appear smaller and leave the dramatic cheekbones without a counterweight.
How Brow Shape Changes Your Face Structure
Few makeup techniques are as structurally impactful as brow shaping, and understanding why helps you use the three-point method with more intentionality. The brows are the only facial feature that frames rather than sits within the face. They sit at the border between the upper and lower thirds of the face and interact visually with both zones simultaneously.
A higher arch creates upward visual momentum, making the eyes appear more open and lifted. This is why arched brows are often associated with a youthful, alert appearance. As we age, the brow naturally descends slightly due to skin laxity, which is why many older women perceive that a slightly higher arch recaptures some of the lifted look they associate with their younger face.
Brow thickness interacts with face proportions in a significant way. Thicker brows tend to make a face look younger and more defined, drawing attention to the eye area in a bold, graphic way. Thinner brows can make the eyes appear more prominent but may also expose more forehead, which visually elongates the upper face. Neither is better in absolute terms, and both can look spectacular when properly mapped and maintained.
The length of the tail influences how wide or narrow the eyes appear to read. A longer tail extends the eye horizontally and can create a more exotic, elongated eye shape. A shorter tail creates a rounder, more doe-eyed impression. Because the three-point method gives you a baseline end point that is anatomically correct, you can use this point as your anchor and adjust slightly in either direction based on your desired effect.
The space between the brows (the glabellar area) also affects facial perception. Keeping brows too close together visually narrows the face and can make expressions appear more intense or furrowed. Too much space between them widens the appearance of the nose and can make the face look less cohesive. The starting point in the three-point method is designed to target the optimal area for your nose width.
Brow Mapping for Sparse Versus Full Brows
The three-point method applies equally to sparse and full brows, but the way you execute the mapping and subsequent shaping differs depending on your starting point.
Working with Sparse Brows
Sparse brows, whether from over-tweezing, genetics, age-related thinning, or medical conditions, require a different approach to the mapping process because your existing hairs may not provide enough visual information to guide shaping decisions. In this case, the mapping is entirely about creating a blueprint for where you will add colour and texture through makeup or semipermanent treatments.
Begin by brushing whatever hairs you have straight up with a spoolie to assess the natural hair distribution. Mark all three points on both sides as precisely as possible. Then, use a brow pencil or powder to sketch the entire brow shape following those three points before you do any tweezing. This gives you a preview of the shape you are working toward and ensures you do not accidentally remove hairs that you actually need for coverage.
For those with very sparse brows, removing hairs is rarely necessary. The focus is almost entirely on strategic addition: building shape through pencil strokes, powder, pomade, or a combination of techniques. Brow serums and growth treatments are worth considering in parallel, as they can gradually restore density over several months and make future mapping easier.
Working with Full or Thick Brows
Fuller brows offer more material to work with but also more margin for error. The three-point method is particularly valuable here because it prevents the common mistake of removing too much from the wrong place. Many people with naturally thick brows focus on thinning the entire brow uniformly when strategic removal of just a few hairs in precise locations would create a much better result.
After marking your three points, identify the hairs that fall outside the mapped shape. On thick brows, these are typically stray hairs above the tail, hairs below the arch on the underside of the brow, and hairs between the two brows. Remove only what falls outside the mapped boundaries. Resist the temptation to tidy up the entire underside of the brow too aggressively, as this technique creates the lifted look that looks polished in the mirror but can feel unnatural as the face moves.
Filling Techniques After Mapping
Once your brow shape is mapped and any stray hairs have been addressed, filling is the final step that brings the look together. The right filling technique depends on your natural brow density, the finish you want, and the tools you prefer.
Using a Brow Pencil
A brow pencil is the most precise filling tool, ideal for mimicking individual hair strokes. Use a pencil that is one shade lighter than your natural brow colour if your brows are dark, or match your shade exactly if your brows are light or grey. Begin at the arch and work outward toward the tail, using light, feathery strokes that follow the direction of natural hair growth. Fill the tail first, as it tends to be the sparsest area and sets the shape. Then work inward toward the start, using even lighter strokes through the body of the brow where hairs are usually most dense.
Using Brow Powder
Brow powder creates a softer, more diffused result that looks more natural on fuller brows and is forgiving of minor imprecision. Use an angled brow brush to apply powder in short, sweeping strokes following the mapped shape. Powder tends to last longer than pencil in humid weather and is less likely to look harsh on mature skin. It is also excellent for adding subtle definition without dramatically changing the appearance of the brow.
Using Brow Pomade or Gel
Pomade gives a more polished, graphic finish and is ideal for creating high-definition brows or for those who want maximum staying power. Apply with an angled brush in precise strokes, building coverage gradually. Pomade is less forgiving than powder, so take your time. Brow gels, both clear and tinted, serve a dual purpose: they hold hairs in place and add colour simultaneously. Clear gels are perfect for full brows that just need grooming after mapping. Tinted gels add a wash of colour and subtle definition that works beautifully for a low-effort, natural look.
Combining Techniques
Many brow professionals combine techniques for the most realistic result. A common approach is to use pencil for precise hair-stroke detailing through sparse areas and powder to soften and blend, then finish with a clear or tinted gel to set everything in place. This layered method is particularly effective for brows that are uneven or have gaps from previous over-shaping.
Threading vs. Waxing vs. Tweezing: What Works Best After Mapping
Once your brows are mapped, the method you use to remove unwanted hairs affects both the precision of the result and the longevity of the shape. Each technique has its advocates, and understanding the distinctions helps you choose the right approach for your skin type and brow goals.
Threading
Threading uses a twisted cotton thread to trap and remove hairs at the follicle level. It is extremely precise, making it well-suited for following the mapped shape exactly. A skilled threading technician can remove individual hairs or defined rows with remarkable accuracy, which is why this technique is particularly popular for the detailed shaping that brow mapping requires. Threading is gentle on skin: it uses no heat or chemical adhesives, making it suitable for those using retinoids or other skin-thinning treatments. The downside is that it requires skill to perform well, and home threading is difficult to master. If you prefer to maintain your mapped brows at a salon, threading is often the most precise professional option.
Waxing
Waxing removes larger areas of hair efficiently and is fast, which makes it popular for regular maintenance appointments. However, it is less precise than threading for detailed brow work, and the wax can sometimes remove more than intended if the application is not carefully controlled. Hot wax is generally more precise than strip wax for brow work. Waxing is not recommended if you use certain prescription skincare ingredients, as it can lift skin along with hair in those cases. For mapped brows, waxing works best when the mapping is done first and the technician uses the marks as guides rather than freehand shaping.
Tweezing
Tweezing is the most accessible method and gives you the most control over individual hairs. For home maintenance of mapped brows, tweezing is ideal: you can work slowly, remove one hair at a time, and stop frequently to assess the overall shape. The main risk with tweezing is over-correction. It is deceptively simple to keep going just one more hair until you have shaped well beyond your mapped points. The three-point method addresses this concern by giving you defined boundaries to stay within. Tweeze only what falls outside the marked points, and step back from the mirror frequently to see the overall effect instead of focusing on the small details.
Maintaining Your Mapped Brows Over Time
Brow mapping is not a one-time event. Hair grows back; face shape does not change dramatically, but skin does shift with age, and your style preferences may evolve. Building a simple maintenance routine around your mapped shape keeps the work you have done looking polished between full mapping sessions.
A weekly spoolie grooming session takes less than a minute and makes a significant difference. Brush hairs upward and trim any that extend well above your mapped top border. Trim any hairs that extend below your bottom border, brushing them downward as you go. Use small, sharp brow scissors with a curved blade for this task, as straight-bladed scissors make it easy to cut too short.
Light tweezing every two to three weeks removes the new stray growth that appears outside your mapped boundaries. Do the procedure in good light and after a warm shower, when the follicles are more relaxed and removal is less painful. Avoid doing heavy tweezing right before an important event, as the skin often shows some redness that takes a few hours to calm down.
Plan a full remapping session every two to three months, or whenever you feel the shape has drifted significantly from your ideal. Remapping from scratch at this cadence prevents the gradual shape drift that occurs when you maintain it by feel rather than by reference points. It also gives you a chance to assess whether your preferred arch height or thickness still feels right or whether you want to adjust your approach.
Brow growth serums, when used consistently, can help fill in over-tweezed areas over the course of several months. Look for formulas containing peptides and biotin, which support keratin production and follicle health. Apply along the brow area nightly, focusing on sparse zones, and give the treatment at least eight to twelve weeks before evaluating results.
Common Brow Mapping Mistakes and How to Avoid Them
Even with a clear method in hand, certain errors come up repeatedly. Knowing them in advance makes it much easier to sidestep them in practice.
One of the most common mistakes is marking only one side before starting removal. It feels logical to map one side, shape it, then repeat on the other, but this approach almost guarantees asymmetry. Always mark both sides completely before removing a single hair. This allows you to compare the marks in the mirror, make any adjustments, and proceed with a true reference for both sides simultaneously.
Mapping with the eyes not looking straight ahead is another frequent error. Your iris position changes dramatically depending on where you are looking, which shifts your arch reference point. Always look directly into the mirror with your gaze level and your chin parallel to the floor when taking measurements. Any tilt of the head or shift in gaze angle introduces inaccuracy into the mapping.
Using the wrong light is a surprisingly significant problem. Yellow-toned bathroom lighting can make brows appear darker, more arched, and more defined than they actually are. Always check your work in natural light or daylight-spectrum lighting before committing to any major shaping. Many people have walked out of dim bathrooms into daylight only to discover the shape looks very different than expected.
Filling before mapping is a workflow error that makes accurate mapping much harder. When the brow is already filled in, it is difficult to see where your natural hairs begin and end, and the pencil marks blend into the makeup. Always map on a clean, bare brow and fill in only after shaping is complete.
Choosing a filling colour that is too dark is a mistake that makes even well-mapped brows look harsh and artificial. A general rule: match your natural brow colour or go one shade lighter if your brows are very dark. If you colour your hair, match the filling colour to your hair rather than to your natural brow shade for a more cohesive look.
Rushing through the mapping process leads to measurements that are slightly off, which then compound as you remove hair. Brow mapping takes fifteen to twenty minutes when done carefully for the first time. Invest that time. The result is worth more than a hurried approximation.
Frequently Asked Questions About Brow Mapping
Can I do brow mapping at home if I have no experience?
Yes, and the three-point method is specifically designed to be self-administered. The key is to work slowly, use a white marking pencil to dot all three reference points before removing any hair, and check both sides in the mirror together before shaping. If in doubt, do less rather than more. You can always remove more on a subsequent session, but you cannot put hair back once it is gone.
How long does the mapping process take?
A full mapping session, including marking, shaping, and filling, takes about twenty to thirty minutes. As you practise and become more comfortable with the reference points, this shortens to fifteen minutes or less. The marking phase itself rarely takes more than five minutes once you understand what you are looking for.
My brows are naturally asymmetrical. Can brow mapping fix that?
Most faces have some degree of natural asymmetry, including in the brows. The three-point method accounts for this by using the nose and eye as reference points on each side independently. This means your mapped points may be at slightly different heights on each side, and that is completely normal. The goal is not to make both brows identical but to make each brow proportionally correct for its side of the face. In practice, mapped brows look more symmetrical than self-shaped brows because the proportions are consistently referenced rather than visually estimated.
What if my natural brows do not follow the mapped shape at all?
Many people discover a gap between their natural brow position and their ideal mapped position. This is especially common at the arch, which tends to fall in slightly different places on natural versus ideally shaped brows. Do not be alarmed. You address the gap through filling and gradual shaping over time. If your natural arch is too low, fill in above your existing hairs in the arch area and remove hairs below. If it is in the wrong horizontal position, shape toward the mapped point over several sessions to allow the brow to transition naturally without obvious patchy growth.
How often should I remap my brows?
A full remapping every two to three months is standard for most people. Between remapping sessions, simple maintenance tweezing every two to three weeks keeps the shape clean. The frequency depends on how fast your hair grows and how precise you like the shape to be. If you notice the shape has drifted or the arch feels off, do not wait for a scheduled session. Pull out your straightedge, remark the three points, and make the correction.
Can brow mapping work for eyebrow microblading or tattooing?
Absolutely. In fact, brow mapping is standard practice in any reputable microblading studio. Before the technician makes a single stroke, they use the three-point method (and sometimes additional reference points) to mark the entire brow shape on the skin with a mapping pencil. The client reviews and approves this shape before the procedure begins. Understanding the method yourself means you can participate more meaningfully in this conversation and advocate for the shape that is right for your face rather than accepting whatever the technician defaults to.
What is the best way to practise the three-point method before committing to shaping?
Use a brow pencil to draw in your three reference points and then sketch the full brow shape on your skin without removing any hair. Live with that drawn-on shape for a day or an evening to see how it reads in different lights and from different distances. Take photos from straight ahead and at slight angles. This dry run builds confidence and confirms that the shape you have mapped genuinely works before you make any permanent changes through hair removal.
Do sparse brows need different mapping than full brows?
The mapping points are identified the same way regardless of density. What changes is the execution. Sparse brows rely more heavily on filling to create the mapped shape since there is not enough hair to shape through removal alone. Full brows rely more on strategic removal. Both benefit equally from the three-point reference system because it provides a blueprint that is not dependent on existing hair placement.
Is there a specific brow shape that makes eyes look bigger?
A slightly arched brow with a clean, well-defined underside tends to make eyes look more open and larger. The key factor is the distance between the top of the eye and the underside of the brow. When this distance is maintained (rather than overfilling below the brow, which reduces the gap), the eye reads as more prominent. A small amount of concealer or highlighter applied just below the arch and along the brow bone after filling reinforces this effect by creating contrast between the brow and the skin.
Can men use the brow mapping method?
The three-point method works on any face regardless of gender. The difference for men is typically in the aesthetic execution: a less defined arch, more natural thickness, and no filling product (or very minimal, natural-looking product if any). The mapping itself identifies the same anatomical reference points and creates the same structural improvements in facial balance.
The Relationship Between Brow Mapping and Professional Treatments
Understanding brow mapping as a DIY practice does not mean professional treatments become obsolete. Rather, it makes you a more informed client when you do seek professional help. When you visit a threading salon, a waxing bar, or a brow studio with a clear understanding of where your three points should land, you can communicate your preferences precisely and catch any errors before they happen.
A common complaint among clients who feel disappointed by professional brow services is that the result looks nothing like what they wanted, but they did not know how to articulate the problem in the moment. Brow mapping gives you a vocabulary for that conversation. You can say, specifically, that the arch is landing too far inward or that the tail is ending too short, rather than vaguely expressing that something looks wrong.
For microblading, powder brows, or brow lamination, the mapping phase is the most important part of the entire service. Any semipermanent brow treatment that gets the mapping wrong will look wrong for weeks or months until it fades. Clients who understand the three-point method can review the technician’s mapping marks before any pigment is applied and request adjustments with confidence.
Brow Mapping as a Long-Term Beauty Practice
What separates brow mapping from most beauty trends is its foundation in anatomy and geometry rather than fashion. Trends change. The thick brow aesthetic of one decade gives way to something different in the next. But the principles of facial proportion that underlie the three-point method remain constant because the human face has not changed.
This means brow mapping is a skill that does not become outdated. You can apply it to whatever brow shape is trending and determine how to adapt that trend to your specific face, whether a particular look genuinely works for your proportions or whether a modified version would serve you better. The three-point method is not prescriptive about what your brows should look like in a stylistic sense. It is prescriptive only about where the structural anchors belong, and everything between those anchors is your creative territory.
With practice, the process becomes intuitive. You will find yourself naturally identifying your arch point when you look in the mirror, noticing when your start point has drifted, and reaching for the spoolie before you have consciously registered that something looks off. That instinct, built through repeated application of the three-point method, is what transforms brow care from a frustrating guessing game into a confident, reliable part of your beauty routine.
Beautifully mapped brows are not about achieving someone else’s ideal or chasing a look that may not suit your face. They are about understanding your own anatomy well enough to work with it rather than against it, to make choices grounded in proportion and structure rather than imitation. That knowledge is permanent, it is portable, and it costs nothing more than a straight edge, a marking pencil, and a few minutes of focused attention in front of a mirror.
Start with the three points. Mark them clearly on both sides. Compare them in the mirror before touching a single hair. Let the geometry do the work. The result will be brows that not only look more symmetrical and polished but that also feel authentically yours, shaped for your face and nobody else’s.
RELATED ARTICLES:
The Ultimate Guide to Brow Lamination, Lash Lift, Brow Tint, and Lash Tint in 2024
3 Brown Sugar Face-Packs For A Soft And Supple Skin
What is eyebrow soap, and how does it work?
The Top Eyebrow Mistakes That Add Years to Your Look
Transform Your Dark Brows: A Step-by-Step Guide to Bleaching
COMMENTS